 UPDATE: Amended post
 Well I've finally completed all the wallpaper panel art projects.
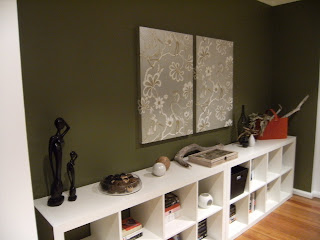
Picture left: These are in the family room and had been waiting for the painting to be finished. The wall is in 'Moss' from Porters Paints. The panels feature Florence Broadhurst 'Egrets' on silver milar.
This photo was taken quite late at night, after I'd finished placing all the objects and filling the shelves with soooo many books. I'm really pleased with the results.
While I was doing these for the house, I thought it would be nice to complete some more, a matching set for a wedding present. Kylie, from My Flying Ducks has already featured them on her blog. These are the ones I used for the DIY instructions below.

I have quite a collection of wallpaper pieces, large and small. The smaller ones are about A4 size and I'm using them for another type of wallpaper project at the moment. It will feature on Project: Bathroom Renovation Rescue.
The first panels I made were in....you guessed it, another Florence Broadhurst print. The recognisable 'Cranes' on matt gold milar. They were originally for my room, but I've decided to hang them in the vestibule/entry to the villa.
I also made a smaller one of the 'Cranes' for Brendon to hang in his home in Brisbane.
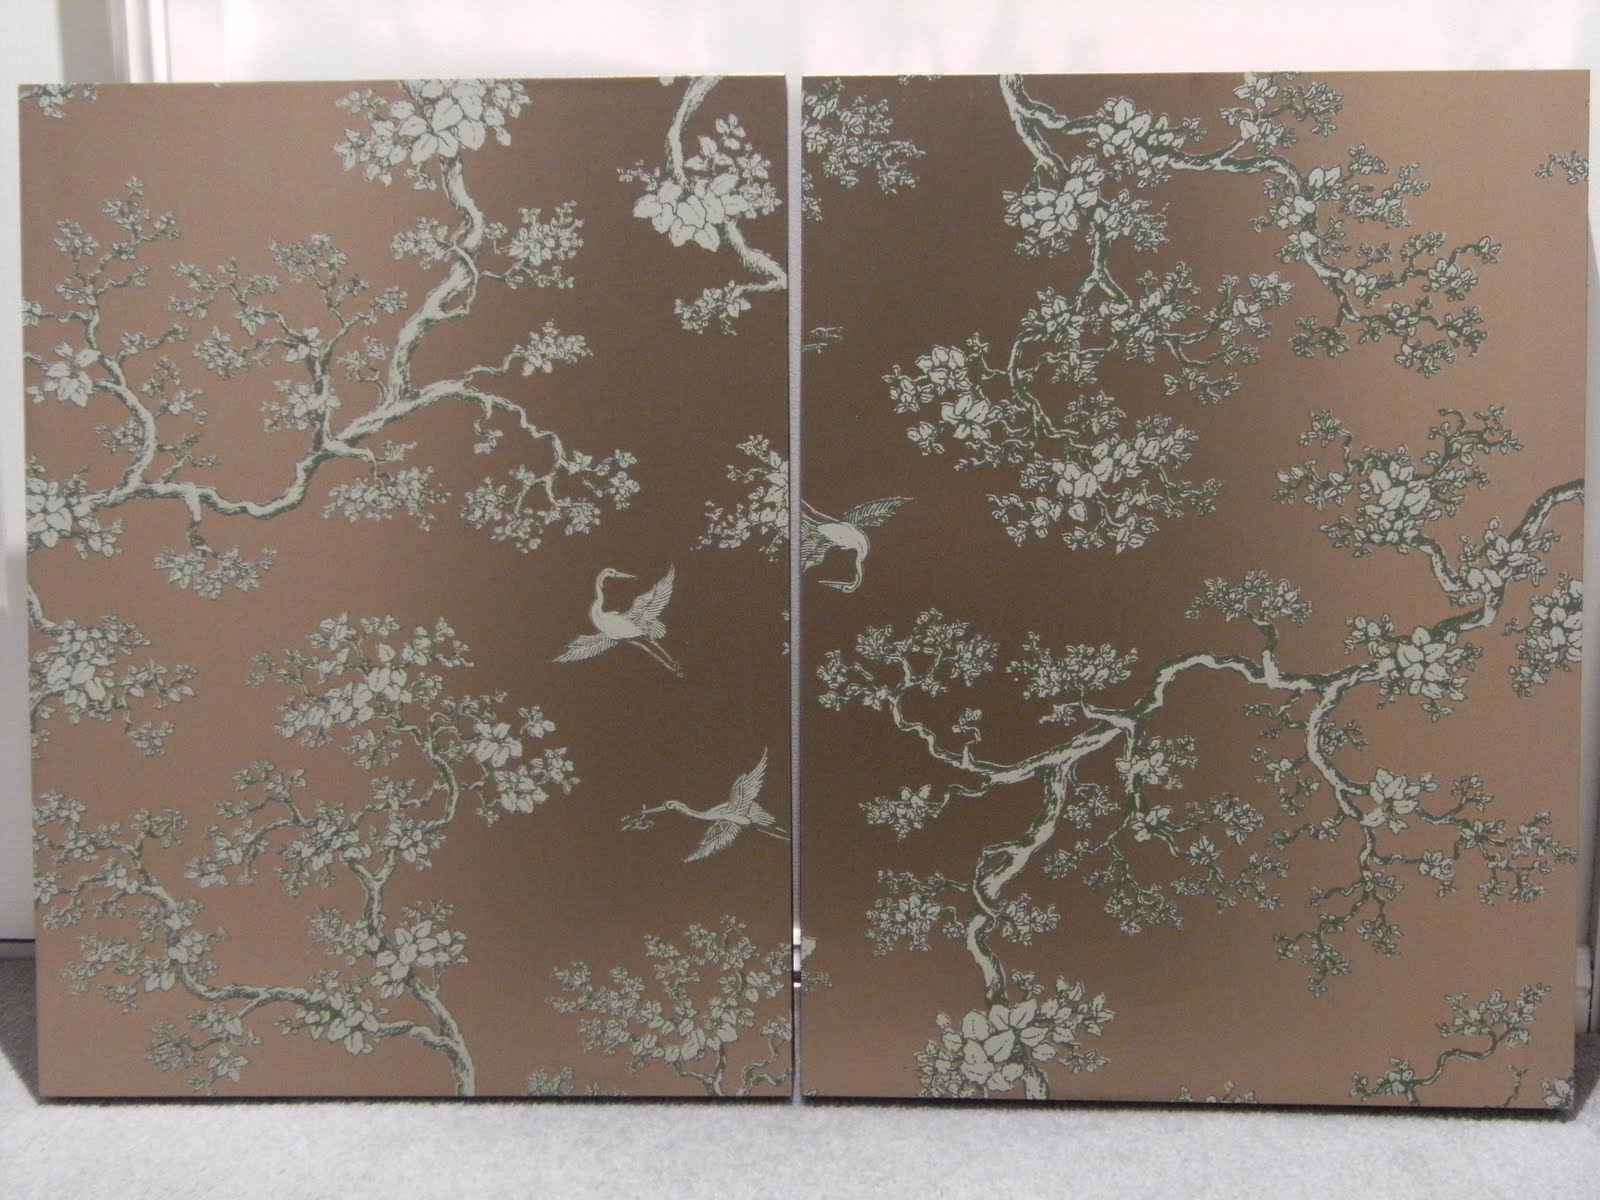 Did you pick that I had photographed the right one upside down!!
 Below I've completed the DIY instructions. Remember these can be made in any size, cost will escalate obviously, but even when you make small ones, the cost could depend on the quality of the wallpaper.
The 'Egrets' in the family room ended up costing about $250 for the two, without labour of course. I think the larger ones from Signature Prints are around $400 each. I do have a helping hand for the heavy stuff, cutting the mitred corners with a drop saw. If you have a handyman around, it will help with the cost.
Places like Bunnings and Mr Ply & Wood will cut to size for you.
A big warning for this project - the measurements should be on the mark and the panel should be square, so use mitred corners and clamps to make sure it's square.
You'll need: masonite, pine, spray glue, liquid nails (clear), staple gun, wood glue, sandpaper, cutting mat, cutting knife and ruler, wallpaper offcut, framing tape (to finish), hanging extras, soft cloth like an old nappy or an old toweling type teatowel.
Use a very flat surface and some old towels to work on when you are gluing the wallpaper to the frame.
1. Cut to size, pine pieces for frame and masonite for the panel (or have it cut at your hardware store) - actual size is up to you. These instructions are for the 300mm x 600mm size. Be careful with larger measurements, you may need a brace so it doesn't bow.
2. Glue and staple mitred joints to make the frame - ensure the whole thing is completely square. Wait for the glue to dry.
3. With the liquid nails, sqeeze a line all the way around the pine frame, fit your masonite panel, smooth side out. This is the side you'll glue the wallpaper to. Doesn't matter if the masonite is a little oversize, in fact it's probably better, because you can get a nice sanded edge when you're done. Just don't have too much of an overhang, it will be more difficult to get a good finish. Turn upside down on flat covered surface and weigh down until glue/liquid nails dry.
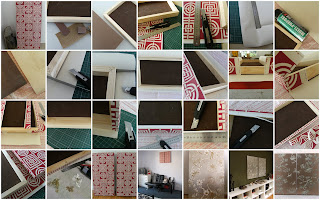
4. When all glues are dry, trim any dried liquid nails with a cutting knife, sand all the edges to make sure there are no overhangs and everything is smooth and straight. Pictures 2 & 3 first row. The edges need to be smooth so you won't see any joins through the paper when finished.
5. Cut wallpaper to size. Don't forget you have the frame to cover also, so make sure you add that measurement PLUS a bit extra. You can trim it up later. The panel width measurement for this set was 300mm + 45mm frame + 20mm frame edge + about 15mm overhang. Do the same for the length - 600mm + 45 + 20 + 15. Pictures 4 & 5 first row.
6. Place the finished frame, masonite side down, on the wrong side of the paper and make a fold line around it. Don't press too much, you could rip the paper. Avoid the corners, you'll do that next.
7. Use a metal ruler to make the folds more defined, including the corners. Place the ruler on the folded line, fold the paper over the ruler to make a more defined line. Picture 6 first row. Spray the outlined area with glue on the back of the paper and then the frame. Picture 7 first row and Picture 1 second row. Don't spray the sides yet, although they will get some overspray. Carefully fit the frame to the folded edges (these are a guide). Turn the frame over and rub gently with the soft cloth to make sure the paper is adhering. Be careful of air bubbles. Don't press down on the sides of the frame yet. Leave to dry for a bit making sure the edges that may have some overspray, aren't touching anything.
NOTE: BE CAREFUL WHEN USING SPRAY GLUE. Read and use according to the instructions.
8. When dry, turn the frame over. Using the cutting knife and metal ruler, align the metal ruler with the longest side of the frame - this will give you a straight line to cut the paper. Refer to pictures 3 & 4 second row of collage above. If you are making a square, the side you cut doesn't matter. If it's rectangle, do the longest sides first.
9. With the frame still paper side down, spray one long side. Lift the frame and 'roll' it onto the paper, don't lift it completely off the flat surface. All you are really doing is standing it on it's edge. Rub edge with soft cloth. Refer pictures 4 & 5 second row. Repeat for the other long side.
10. Because you've already cut the line along the length of the paper, you can now glue the wallpaper along the end/edge of the frame and cut. Refer pictures 6 & 7 second row. Glue paper over frame edge then trim. Refer picture 1 third row.
11. Now glue the ends using the same technique of 'rolling' the frame onto the paper. Pictures 2 & 3 third row. Trim any paper so you have a clean edge when the paper is folded and glued over the end of the frame. Picture 3 third row.
12. Trim all edges. Pictures 4, 5, 6 & 7 third row.
13. Cover all raw edges of paper with framing tape. You can get this from picture framing businesses. I bought mine from an art supply and framing store, in Taree of all places. It's usually a brown paper bag colour and is sometimes a paper texture.
14. To complete the second and subsequent panels, repeat as above. If you have a patterned paper, make sure you match the pattern when you cut the second and subsequent pieces. Picture 1 forth row.
15. Attach a hanging system you are used to.
Hope that all made sense. It's always hard to 'describe' in your own words so other people know what you are taking about.
TIPS:
They need to be completely square and when you glue and fold the paper over, the edges are crisp and sharp lines.
Watch out for air bubbles. You can't get them out once they are there, so be careful when gluing.
Go slow and use the soft cloth to rub the paper while the glue is still wet.
A tip for ALWAYS, use sharp cutters/knives. These will give you clean cut edges, otherwise the paper will rip and tear.
Good luck if you are going to give it a go.
If you are having trouble at all, on any of the projects, email me on designed.to.a.t@optusnet.com.au and I will email you the larger photos.
Hi Terese - this is fantastic! I'm going to put a couple of your DIY pics on my blog and refer people to your site for the instructions. How exciting to see our wallpaper panels in progress!
ReplyDeleteKylie
xo
PS. I'm almost worked up the courage to do something with the off-cuts you gave me - I framed a tiny sample as a gift for someone and it looks amazing!
Thanks Kylie...They're were fairly easy to do, you just need to work carefully and slowly with the spray glue. It goes everywhere...even the hairs on your arms feel 'glued'. Thanks for encouraging people to visit. I'll have a few more up soon. I've been really busy lately and can now get back into it.
ReplyDeleteThanks again. Also if you need a hand with the fabric, I'll have the Cushion Project up very soon.
Terese
I'm hoping to start a sewing course soon, so that will be a great help with the fabric - and any tutorials you post will be most welcome! I also love what Julie from Olive and Joy did with her fabric - she paid for it to be turned into a cute little ottoman, it was was surprisingly cost effective!
ReplyDeleteThey look absolutely gorgeous - I'm in love with the Florence Broadhurst wallpaper - my favourite is the one with horses (I don't know what its called, but I love it!!). One day I'll work up the courage (and the bank balance) to buy some!
ReplyDeleteI have some prestretched canvases here at home - do you think that I could glue wallpaper to the canvas and it would work alright? Or am I completely off the mark here? Masonite and things like that scare me! lol
Hi Emma. Gluing wallpaper to canvas just doesn't work. I tried it while I was working out a way to do them. Don't be scared of masonite, it's quite easy to work with. I'm not sure if places like Bunnings will cut masonite, but they definitely cut pine (etc) to size. Get yourself a small piece of masonite from the hardware store and have a go at hand sawing it (with a sharp saw of course). It's not expensive, so maybe get the feel for it that way.
ReplyDeleteGood luck anyway if you have a go...Terese
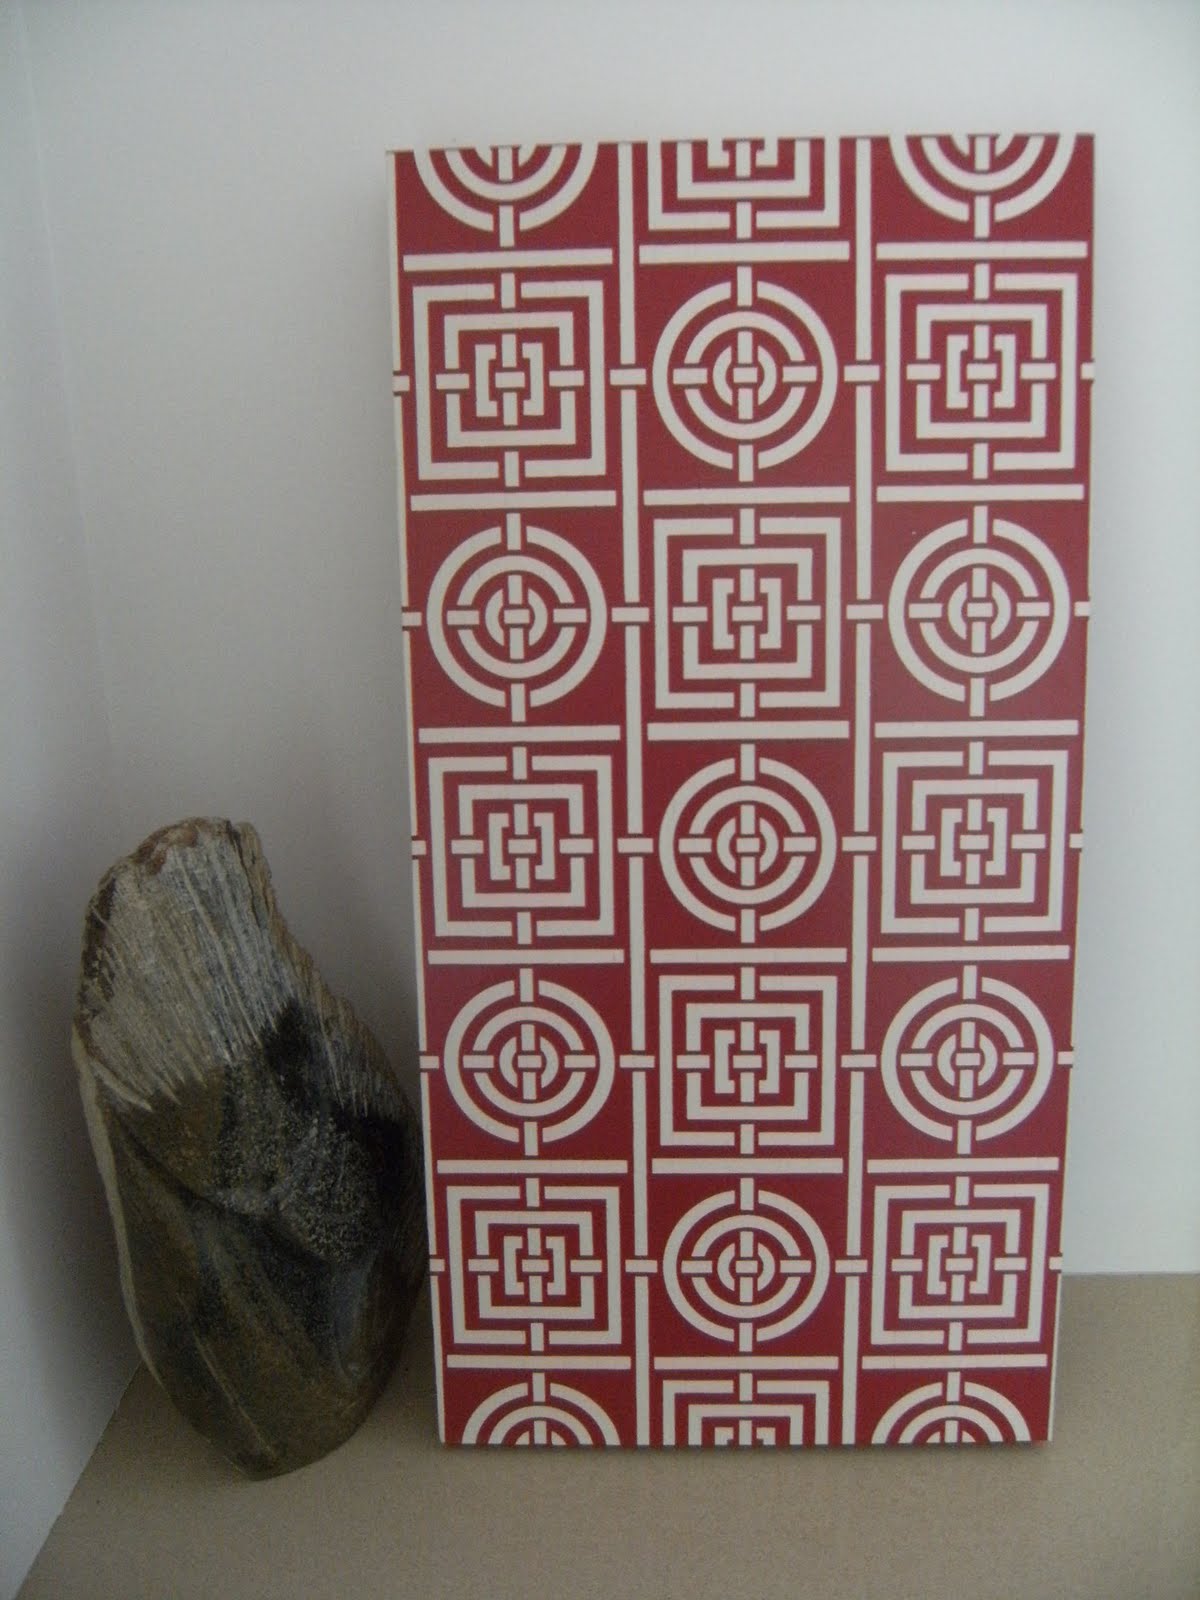
Kylie I had a look at Olive & Joy and the fabric she used for the lamp makeover is what I used for the top of my Ottoman. The sides are your print, Circles and squares, but in the same lime green.
ReplyDeleteI've also got a cushion in the same Bamboo print.
I have so many pictures to cull for both the Ottoman and Cushion posts, so I've just finished a quick Florence post and will hope to at least get the Cushion post finished on the weekend.
Hope it will help you....Terese
Thanks Terese, I think I'll bite the bullet and go the masonite route. It IS scary though! Thanks for the heads up in regards to using the canvas - I didn't want to try in case it ruined the canvases, I'll just paint them instead like I originally intended to do :)
ReplyDeleteI'd love to try this project out. The design is so oriental and it'll be perfect for my place's current theme. I'd have to save for it first though. Anyway, thanks a lot for sharing this Terese.
ReplyDeleteHi Regina, thank you for your comments. You can do the same project with less expense. You could purchase a blank art canvas in the size you are after and you can cover it with either fabric or wallpaper.
DeleteWallpapers don't have to be the expensive ones, as long as they are not a thin weight (called gsm). I can direct you to Spoonflower, which is where I have my fabrics and wallpapers printed. Search through any design characteristics you are after and you may find something. Just remember though, it can restrict you on the width of your artwork.
If you need a hand at all just email me.
Here's the link for my shop on Spoonflower:
http://www.spoonflower.com/profiles/designedtoat
And for Spoonflower:
http://www.spoonflower.com/welcome
Good luck...Terese