06 May 2013

Project: Wallpaper Panel Art

UPDATE: Amended post

Well I've finally completed all the wallpaper panel art projects.

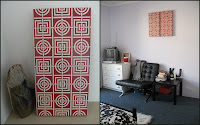
Picture left: These are in the family room and had been waiting for the painting to be finished. The wall is in 'Moss' from Porters Paints. The panels feature Florence Broadhurst 'Egrets' on silver milar.

This photo was taken quite late at night, after I'd finished placing all the objects and filling the shelves with soooo many books. I'm really pleased with the results.

While I was doing these for the house, I thought it would be nice to complete some more, a matching set for a wedding present. Kylie, from
My Flying Ducks has already featured them on her blog. These are the ones I used for the DIY instructions below.
I have quite a collection of wallpaper pieces, large and small. The smaller ones are about A4 size and I'm using them for another type of wallpaper project at the moment. It will feature on Project: Bathroom Renovation Rescue.

The first panels I made were in....you guessed it, another Florence Broadhurst print. The recognisable 'Cranes' on matt gold milar. They were originally for my room, but I've decided to hang them in the vestibule/entry to the villa.

I also made a smaller one of the 'Cranes' for Brendon to hang in his home in Brisbane.Did you pick that I had photographed the right one upside down!!
Below I've completed the DIY instructions. Remember these can be made in any size, cost will escalate obviously, but even when you make small ones, the cost could depend on the quality of the wallpaper.
The 'Egrets' in the family room ended up costing about $250 for the two, without labour of course. I think the larger ones from Signature Prints are around $400 each. I do have a helping hand for the heavy stuff, cutting the mitred corners with a drop saw. If you have a handyman around, it will help with the cost.
Places like Bunnings and Mr Ply & Wood will cut to size for you.
A big warning for this project - the measurements should be on the mark and the panel should be square, so use mitred corners and clamps to make sure it's square.
You'll need: masonite, pine, spray glue, liquid nails (clear), staple gun, wood glue, sandpaper, cutting mat, cutting knife and ruler, wallpaper offcut, framing tape (to finish), hanging extras, soft cloth like an old nappy or an old toweling type teatowel.
Use a very flat surface and some old towels to work on when you are gluing the wallpaper to the frame.

1. Cut to size, pine pieces for frame and masonite for the panel (or have it cut at your hardware store) - actual size is up to you. These instructions are for the 300mm x 600mm size. Be careful with larger measurements, you may need a brace so it doesn't bow.
2. Glue and staple mitred joints to make the frame - ensure the whole thing is completely square. Wait for the glue to dry.
3. With the liquid nails, sqeeze a line all the way around the pine frame, fit your masonite panel, smooth side out. This is the side you'll glue the wallpaper to. Doesn't matter if the masonite is a little oversize, in fact it's probably better, because you can get a nice sanded edge when you're done. Just don't have too much of an overhang, it will be more difficult to get a good finish. Turn upside down on flat covered surface and weigh down until glue/liquid nails dry.
4. When all glues are dry, trim any dried liquid nails with a cutting knife, sand all the edges to make sure there are no overhangs and everything is smooth and straight. Pictures 2 & 3 first row. The edges need to be smooth so you won't see any joins through the paper when finished.
5. Cut wallpaper to size. Don't forget you have the frame to cover also, so make sure you add that measurement PLUS a bit extra. You can trim it up later. The panel width measurement for this set was 300mm + 45mm frame + 20mm frame edge + about 15mm overhang. Do the same for the length - 600mm + 45 + 20 + 15. Pictures 4 & 5 first row.
6. Place the finished frame, masonite side down, on the wrong side of the paper and make a fold line around it. Don't press too much, you could rip the paper. Avoid the corners, you'll do that next.
7. Use a metal ruler to make the folds more defined, including the corners. Place the ruler on the folded line, fold the paper over the ruler to make a more defined line. Picture 6 first row. Spray the outlined area with glue on the back of the paper and then the frame. Picture 7 first row and Picture 1 second row. Don't spray the sides yet, although they will get some overspray. Carefully fit the frame to the folded edges (these are a guide). Turn the frame over and rub gently with the soft cloth to make sure the paper is adhering. Be careful of air bubbles. Don't press down on the sides of the frame yet. Leave to dry for a bit making sure the edges that may have some overspray, aren't touching anything.
NOTE: BE CAREFUL WHEN USING SPRAY GLUE. Read and use according to the instructions.
8. When dry, turn the frame over. Using the cutting knife and metal ruler, align the metal ruler with the longest side of the frame - this will give you a straight line to cut the paper. Refer to pictures 3 & 4 second row of collage above. If you are making a square, the side you cut doesn't matter. If it's rectangle, do the longest sides first.
9. With the frame still paper side down, spray one long side. Lift the frame and 'roll' it onto the paper, don't lift it completely off the flat surface. All you are really doing is standing it on it's edge. Rub edge with soft cloth. Refer pictures 4 & 5 second row. Repeat for the other long side.
10. Because you've already cut the line along the length of the paper, you can now glue the wallpaper along the end/edge of the frame and cut. Refer pictures 6 & 7 second row. Glue paper over frame edge then trim. Refer picture 1 third row.
11. Now glue the ends using the same technique of 'rolling' the frame onto the paper. Pictures 2 & 3 third row. Trim any paper so you have a clean edge when the paper is folded and glued over the end of the frame. Picture 3 third row.
12. Trim all edges. Pictures 4, 5, 6 & 7 third row.
13. Cover all raw edges of paper with framing tape. You can get this from picture framing businesses. I bought mine from an art supply and framing store, in Taree of all places. It's usually a brown paper bag colour and is sometimes a paper texture.
14. To complete the second and subsequent panels, repeat as above. If you have a patterned paper, make sure you match the pattern when you cut the second and subsequent pieces. Picture 1 forth row.
15. Attach a hanging system you are used to.
Hope that all made sense. It's always hard to 'describe' in your own words so other people know what you are taking about.
TIPS:
They need to be completely square and when you glue and fold the paper over, the edges are crisp and sharp lines.
Watch out for air bubbles. You can't get them out once they are there, so be careful when gluing.
Go slow and use the soft cloth to rub the paper while the glue is still wet.
A tip for ALWAYS, use sharp cutters/knives. These will give you clean cut edges, otherwise the paper will rip and tear.
Good luck if you are going to give it a go.
If you are having trouble at all, on any of the projects, email me on designed.to.a.t@optusnet.com.au and I will email you the larger photos.

01 July 2012

Not so Audrey-nary...

Audrey Hepburn was not your ordinary (or Audrey-nary) everyday person...

I have such admiration for her and the work she did for children as a UNICEF ambassador... Not only that, she was such a beautiful person, inside and out.

{Image: Craig Alan}

Here are some links to previous posts I've done where I have mentioned her:

1. 'A thought for you...' - January 15, 2011. Part of a series called 'Weekend Thoughts' I was documenting. This one was one of her quotes, which to me rang true at the time of the Brisbane floods. Let me know if you think I should start doing them again...
2. I am woman...International Women's Day - March 8, 2011. This was more about the history behind International Women's Day where I mentioned Audrey and her work for UNICEF. Who do you admire?
3. I've left the best until last! 'Favourite Things project - Week Five - People in my Life...' August 5, 2010 - my son Darren's birthday. This one holds a place in my heart because I posted it on one of my sons birthdays.

When I first started blogging, I was introduced to Tazim, from 'Being Tazim', a blogger in Canada. Tazim was engaging other bloggers in a 'Favourite Things' project, where we blogged each week about a particular subject. The week I completed this post the subject was about 'People In my Life'. Whilst I used this opportunity to talk about my two wonderful sons, I ended the post talking about Audrey. Both the boys know how much I love her and have given me some wonderful 'Audrey' gifts over the years.

What do you think of this fabulous artwork by Craig Alan? One of the Facebook Pages I follow, lead me to this great site called 'This is Colossal' where they featured this and other pieces of photographic art using people, yes PEOPLE! Look closely at the photo, it's all people! Go and have a look, you'll be amazed at the ones from 1915 using Armed Forces personnel for a campaign to support the American War effort. Click on the photo to visit the site.


Photobucket

30 June 2012

BOON!!

Yes BOON...not BOOM!

BOON Chocolates at 251 Victoria Street Darlinghurst, right here in beautiful Sydney.

Gorgeous chocolates, beautiful store, fabulous philosophy and lovely welcoming people.

Alex and Fanny Chan, the brother and sister powerhouse behind BOON have been in their business for about 4 years now. They have built a reputation in the chocolate world for their attention to detail, mouth watering flavours and their freshness.

BOON philosophy is simply...'to produce in small batches so that the chocolates are consumed within four weeks of being made. Freshness is key to appreciating the individual flavour characteristic to each praline. Freshness combined with the best natural ingredients and flavours is the key.'

I was lucky enough to visit yesterday with a group from work and have Alex talk to us about their business and their product. Not only do they sell to the public, they have some large corporate contracts as well.

Cartier, Ferrari!!!

I can't wait to make a hot chocolate with one of my purchases!


13 May 2012

My first foray into the world of Spoonflower contests...

I took the plunge...and entered my first design in one of the weekly fabric design contests run by Spoonflower. Retro Kitchen design with a restricted palette.

Entries closed on May 9 and voting is open now. The winner will be announced on Thursday May 17.

I'm very nervous as this is the first time I've ever had one of my fabric designs out there in the 'public eye'. My design was uploaded about a week before the due date, I was that happy with it.

Now I have to just sit and wait to see if I made the top 10...mmm. With the MOST entries Spoonflower has ever had for a palette restricted contest, not sure how I'll go! 282 entries were received! Wish me luck!

29 April 2012

Are you feeling creative...

Well...I really haven't kept my blog up to date lately, as I've been concentrating on building my portfolio of fabric designs. Also sourcing printers and doing some of my own screen printing took up more time than I expected.


Having been a Blogging Your Way student last year, what better way to get back on track with my blog posts than selecting some of my earlier posts that were well received. In one of the lessons, it was suggested to look at posts that had high counts of views and list them in a post. A reconnection, I suppose, to the writer and their blog. These posts tend to get lost in the 'archives' and new blog viewers wouldn't know they were there.

So...based on the amount of views some of these posts received, let me invite you to take another look, or perhaps your first look.

For your viewing and maybe some practical application: 
  1. My Creative Space - A gift for Sophia
  2. Creative Collective - New Year = New Craft
  3. Favourite Things - Week 12
  4. Project: Felt Necklace
  5. Project: Ikea Draws


I'm a doer, I love making things, getting in and putting a design on paper then executing it. There's nothing like the feeling of making things, and decorating, especially with something I've made.

My background is sewing and fabrics but as the years have gone by I've picked up many extra skills. I even have my own power tools! Insert 'Tim the Toolman-like' laugh here, for those of us who remember good ol' Tim. I have to say, my projects fare a bit better than Tim's!

I've selected some of my project posts for you to review, and maybe even give them a go yourself. Here's a link to my projects page for any of the others I've made over the last few years. There are still a few I haven't finished the detailed instructions for.

Do you know, sometimes this is more difficult than the actual project. I have the words and step by step instructions in my head, but you need to get them SO right for other people to be able to follow them clearly and make the item. I will be getting back to writing these soon.

I hope you've enjoyed taking a look at these projects and perhaps are thinking about trying one or two yourself. If you'd like some help, please feel free to email me.

Enjoy!

PS My 'Followers' gadget is still AWOL and I don't know how to fix it. If anyone has any ideas, please email me on designed.to.a.t@optusnet.com.au
 

24 March 2012

Daytrippin'...

Canberra, the uniquely designed capital of Australia, is fast approaching it's Centennial year

The birth of Canberra as the national capital was marked by the laying of the foundation stones for a ‘Commencement Column’ on 12 March 1913, and the naming announcement by Lady Denman, wife of the then Governor-General.

From where I live in Sydney, it's just a quick 2hr 15-30min trip, approximately, as I am close to a motorway that takes you up to freeway speeds within minutes of leaving home. No trying to get through city traffic to get on my way, it's just a few blocks to the motorway and off I go.

So why don't I do regular trips to Canberra? I have no excuse, but when I have a reason to go, it's always a surprising and pleasant day. The latest reason, I'm very embarrassed to say, was to increase the 'mileage' on my car, as I am close to reporting it for the end of Fringe Benefits Tax year!

Despite having to ensure I meet my mileage requirements, I'm also always happy to do a day trip in my car. Driving is something that's in my blood. My Dad used to drive taxis in Sydney and has also done stints in trucks when I was small, in between his jobs as a qualified greens keeper. Driving trips were something we always did when I was a child. Heading off late on a Friday afternoon to drive the 4 or 5 hours to my Grandparent's home in Nambour QLD, then the drive back again on Sunday night.

I wasn't by myself, so the Canberra trip was even more pleasant with a companion, and we stopped to have a lovely lunch on the way.

Let me show you in pictures how lovely a day it was, with beautiful weather turned on and lots of activities and events happening. We ran out of time to visit the Bonsai exhibit/show and needing to get back on the road meant we weren't able to stay for the fireworks that were happening last weekend.

 Beautiful sunshine-y day on the way - the road beside Lake George 
or Weereewa in the area's indigenous language.
Top Left: A Bronze cast of parliamentarians and 2 Australian Prime Ministers, John Curtin and Ben Chifley. Ben Chifley was Treasurer at the time, later to be our 16th Prime Minister.
Top Right: Beautiful tree lined walkway through a park beside old Parliament House
Bottom: Plaque explaining the bronze statue of Curtin and Chifley.
 National Portrait Gallery
 Old Parliament House


Top Left: More tree lined footpaths
Top Right: The High Court of Australia
Bottom: Part of the refurbished Old Parliament House gardens
 

 Lake George - on the way home. Dark clouds forming giving an eerie back drop to the Lake.
 Heading home!
 

25 February 2012

purebloggers.com...?

I've had a couple of emails from 'purebloggers.com' of late, luckily they've been relegated to my 'junk email' folder, so it gave me pause to think and investigate.

It looked legit but you know how wary you have to be, so I did a search and wasn't really able to find anything.

My stats show in the last week there has been 5 referrals under 'traffic sources' from this site, and 6 in the month. It appears to have ramped up in the last 7 days. 

The email comes from purebloggerss@gmail.com (with a double 's') and it looks like this: 

If anyone has any other information on this please let others know, just in case. You can never be too careful in this environment.

Related Posts Plugin for WordPress, Blogger...